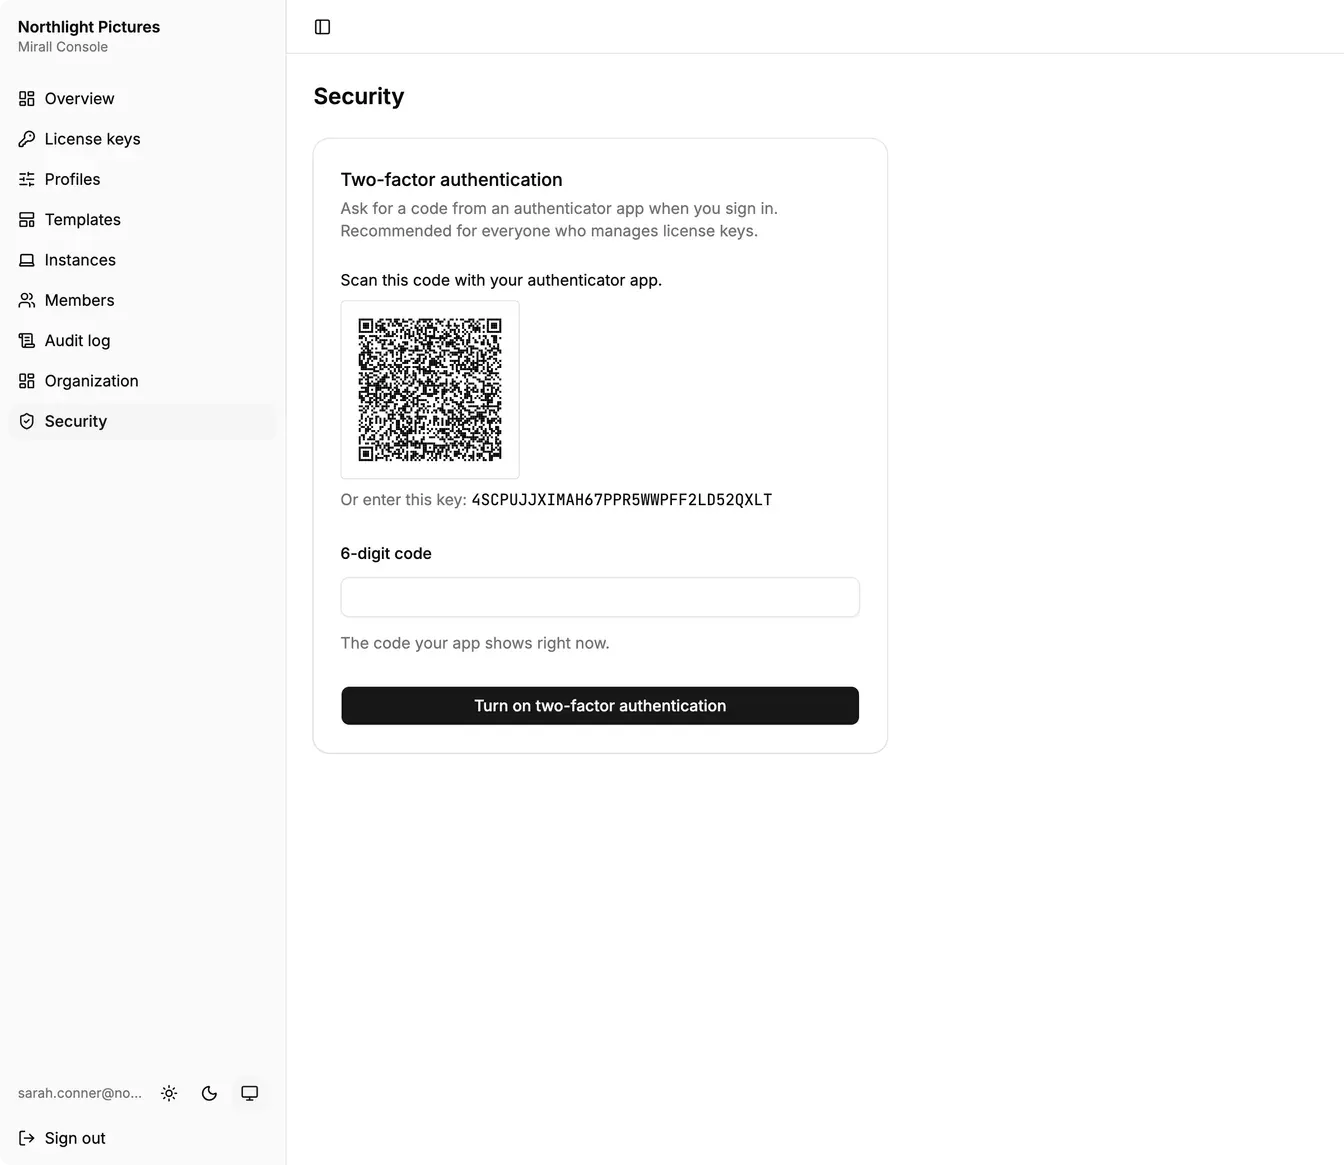
Adds a code from an authenticator app to your Console account. It is recommended for everyone who manages license keys, and the Overview asks every owner until it is on.
1Open Security in the sidebar and click Set up two-factor authentication.
2Scan the code with your authenticator app, or enter the key shown below it.
3Type the 6-digit code your app shows right now and click Turn on two-factor authentication.
Two-factor authentication is on confirms it. If the code didn't match, wait for the next one: codes change every 30 seconds.
Invite a member
Members share the work of running the Console. You invite them with a link that works for one address.
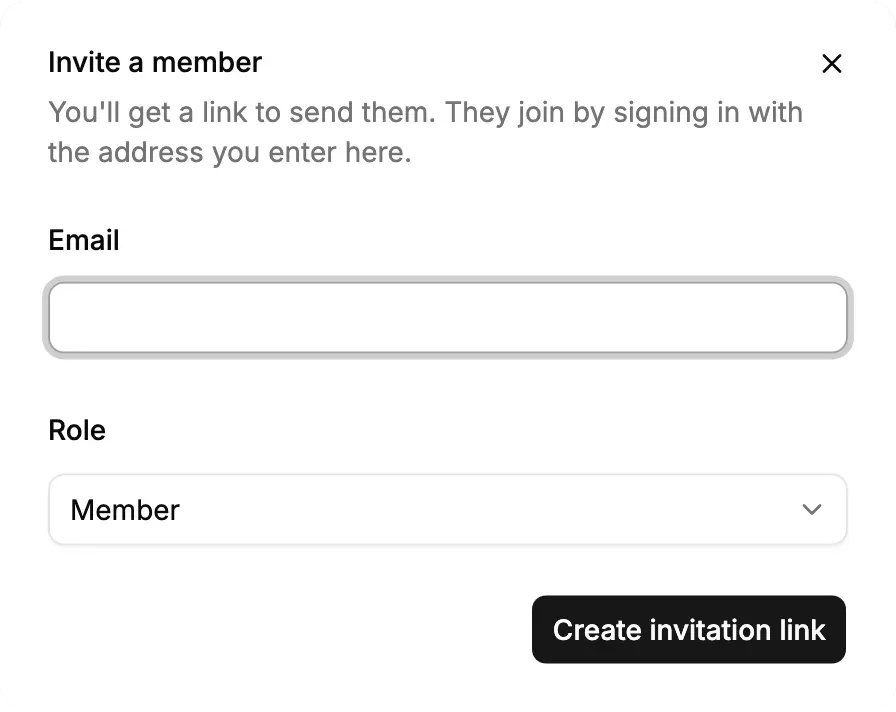
1Open Members and click Invite member.
2Enter their Email and choose a Role. Only an owner can invite another owner.
3Click Create invitation link, copy the link and send it to them.
The link is shown only once. It works for that address only and expires after seven days. They open it, click Accept and sign in, and join with the sign-in link the Console emails them.
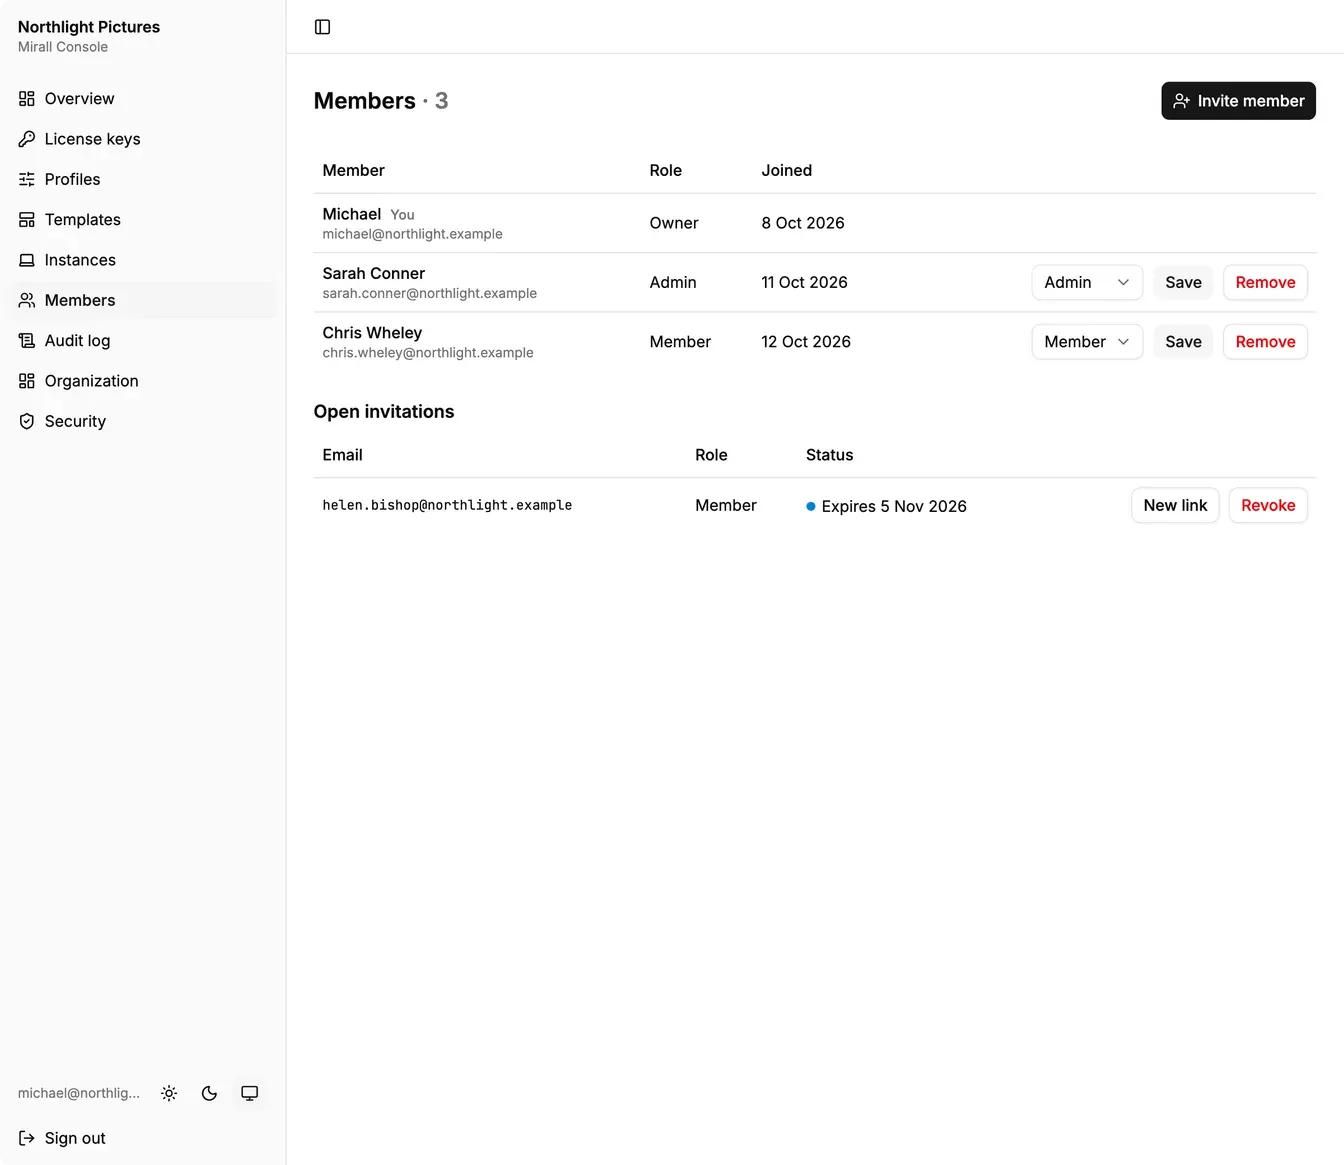
Until then the invitation is listed under Open invitations. New link replaces a lost or expired link, and the old one stops working; Revoke withdraws the invitation.
An email address belongs to one organization in the Console. Someone already in another organization can't accept.
Owners and admins manage the members list. You can't change your own row, and only an owner can change an owner's.
1Open Members.
2To change a role, choose it in the member's row and click Save.
3To remove someone, click Remove, then Remove member.
A removed member loses access to the Console at once. Their license keys stay as they are: revoke those separately if they should stop working too.
An organization needs at least one owner. To change the last owner's role, make someone else an owner first.
License keys
Issue a license key
Each person who uses Mirall gets a key. The key decides which profile their computers receive, and one key covers all of that person's computers.
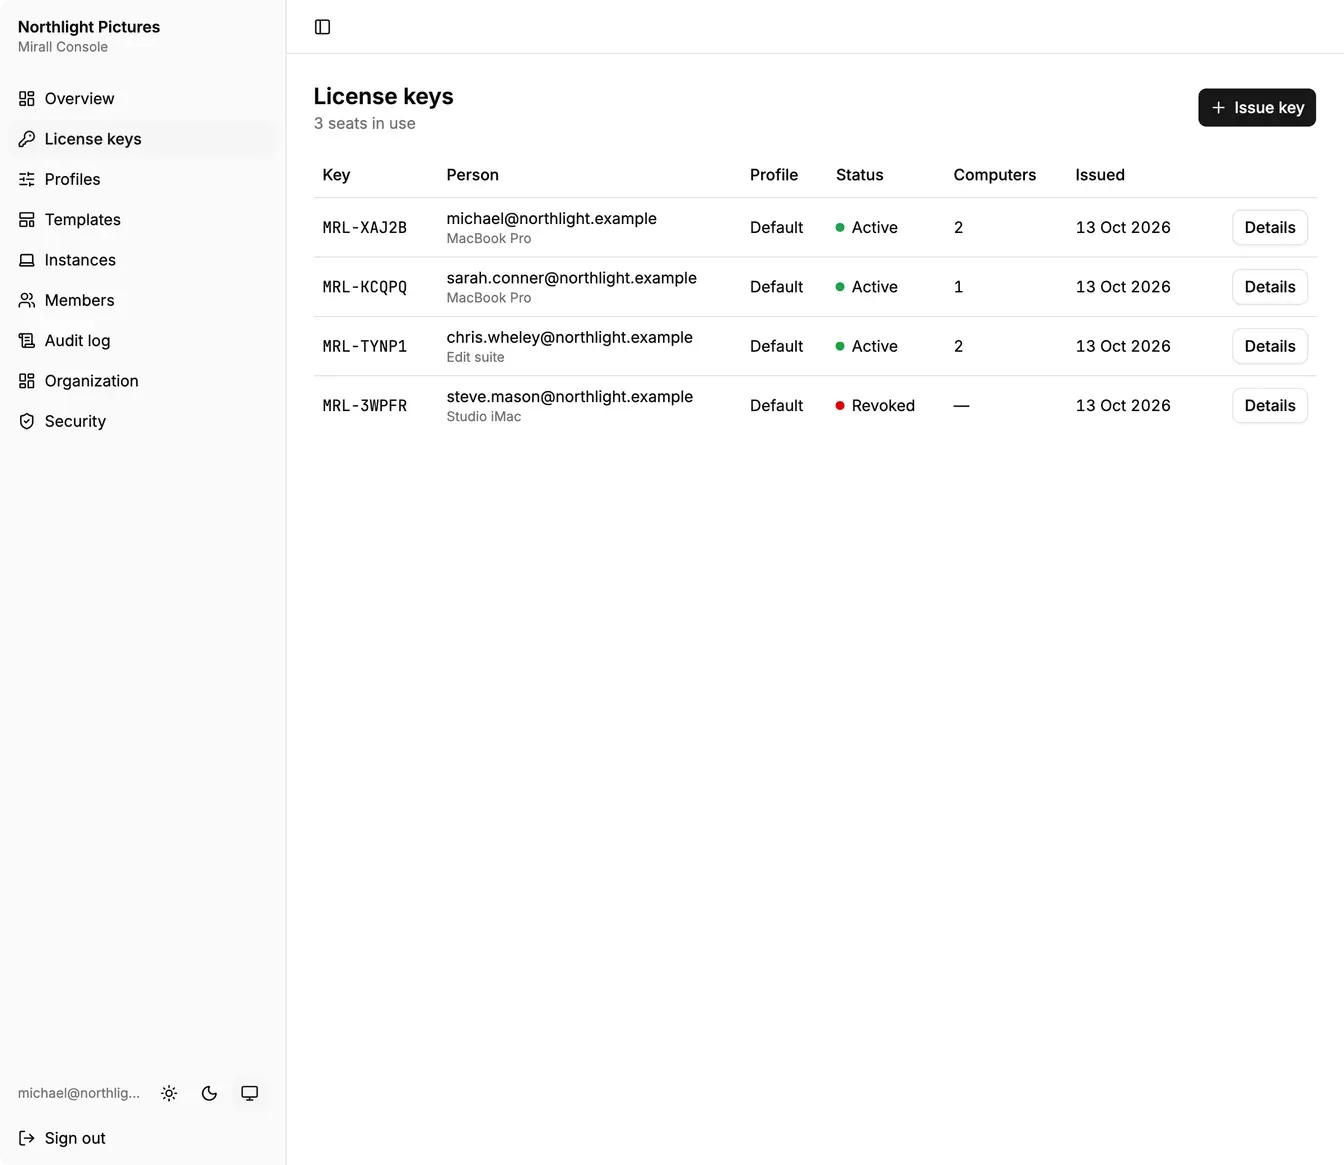
1Open License keys and click Issue key.
2Enter the Email of the person, and optionally their Name.
3Choose the Configuration profile their computers receive, and optionally a Label such as Edit suite.
4Click Issue key, then copy the key or the activation link.
5Click I've stored the key.
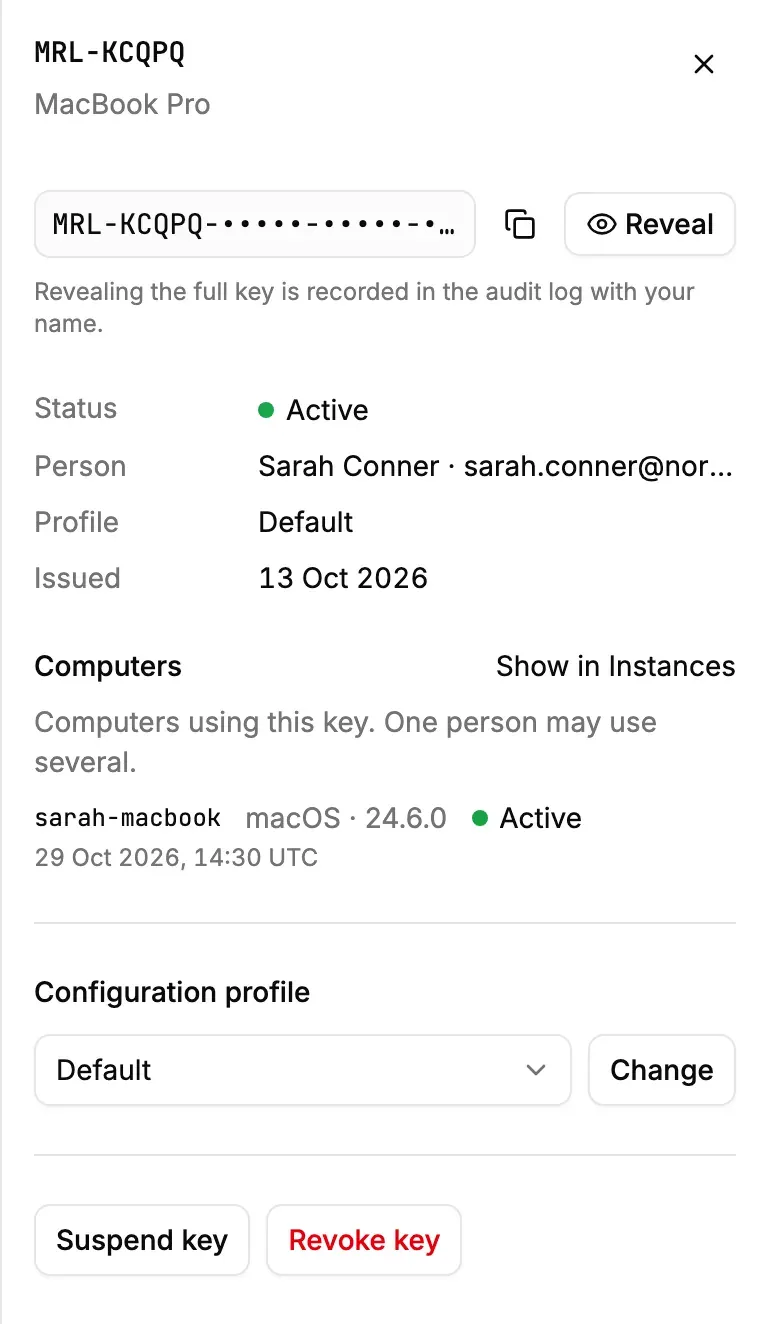
The dialog is the only place the full key is shown without a record. After that, the list shows only the key's first characters, and seeing the whole key again is a recorded reveal.
The line under the heading counts the seats in use. Going over your plan is shown, never blocked.
The activation link is what connects a person's Mirall to your organization. It carries their key, so it is shown only beside the full key.
1Open License keys and click Details on the person's key.
2Click Reveal. The full key appears, with the activation link buttons below it.
3Click Copy activation link and send it to the person.
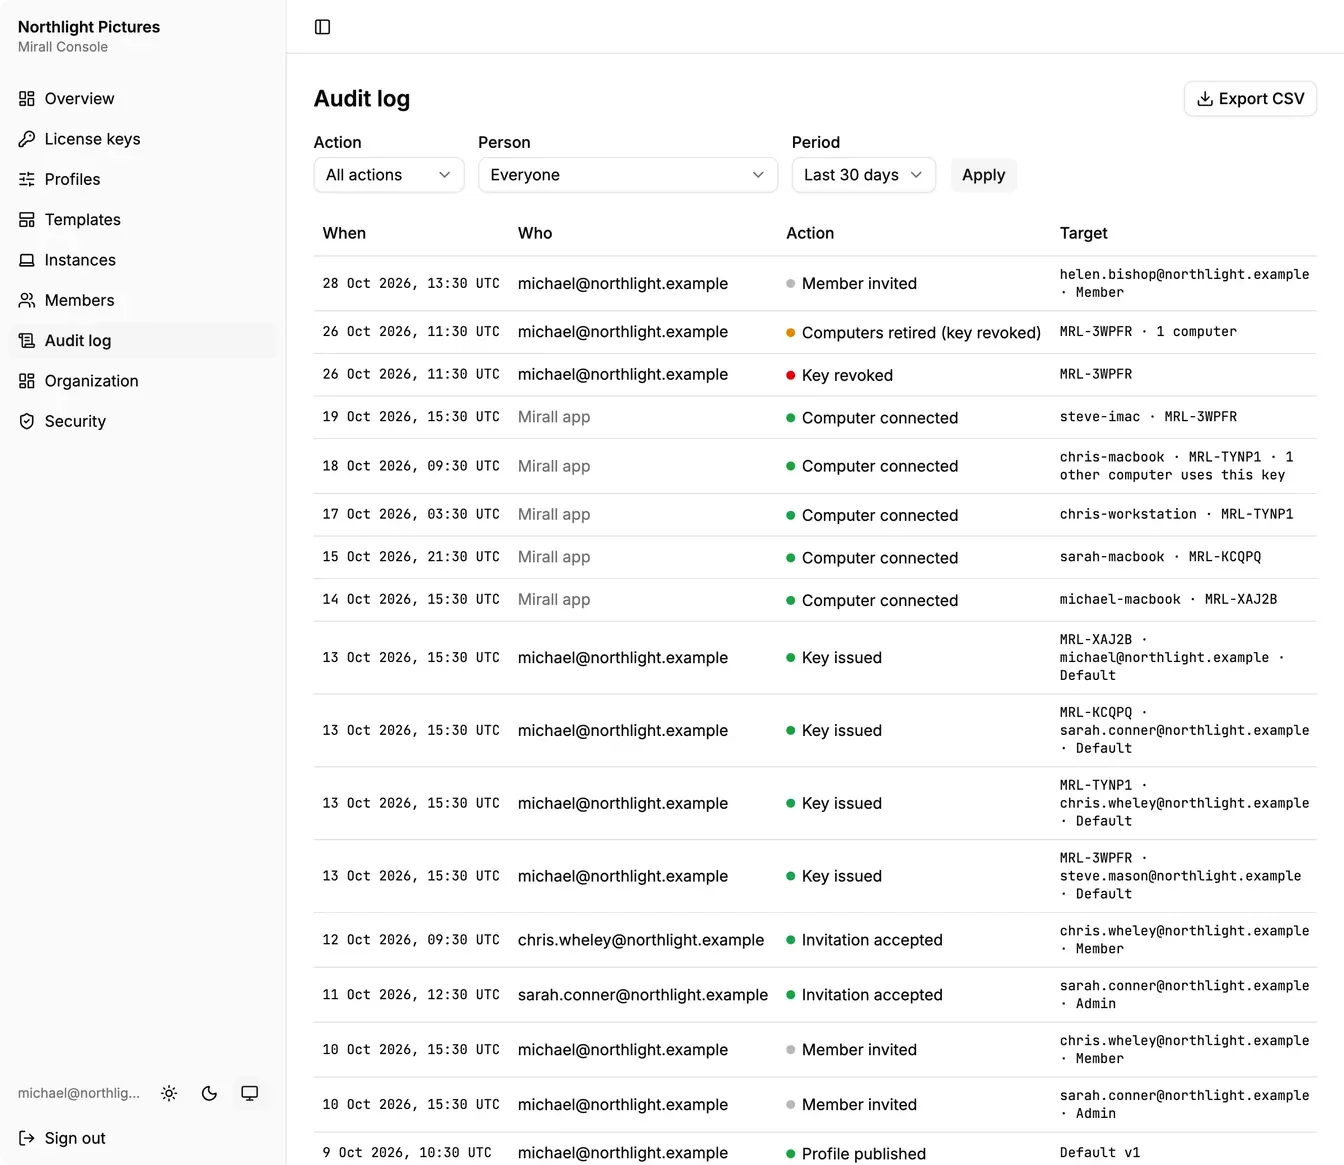
Each reveal is recorded in the audit log with your name, and the key hides itself again after 30 seconds. Copy app link copies the same link in the form a script can open with open, start or xdg-open, for connecting computers you set up yourself.
The activation link becomes available once configuration delivery is set up for your organization. Until then the details say so instead of offering the buttons.
Changes which configuration a person's computers receive, without a new key.
1Open License keys and click Details on the key.
2Choose the new Configuration profile and click Change.
Their computers receive the other profile's live version. Until they have applied it, Instances shows them as Other profile.
Suspend or revoke a key
Suspending is reversible. Revoking is permanent: when a person leaves, revoke their key.
1Open License keys and click Details on the key.
2Click Suspend key. Resume key makes it active again.
3Or click Revoke key, read what it does, and click Revoke key again.
A revoked key stops receiving configuration, frees its seat, and retires its computers in Instances. No computer can connect with it again. To give the person access again, issue a new key.
Revoking does not remove configuration a computer has already applied, and it cannot recall anything already shared with that computer.
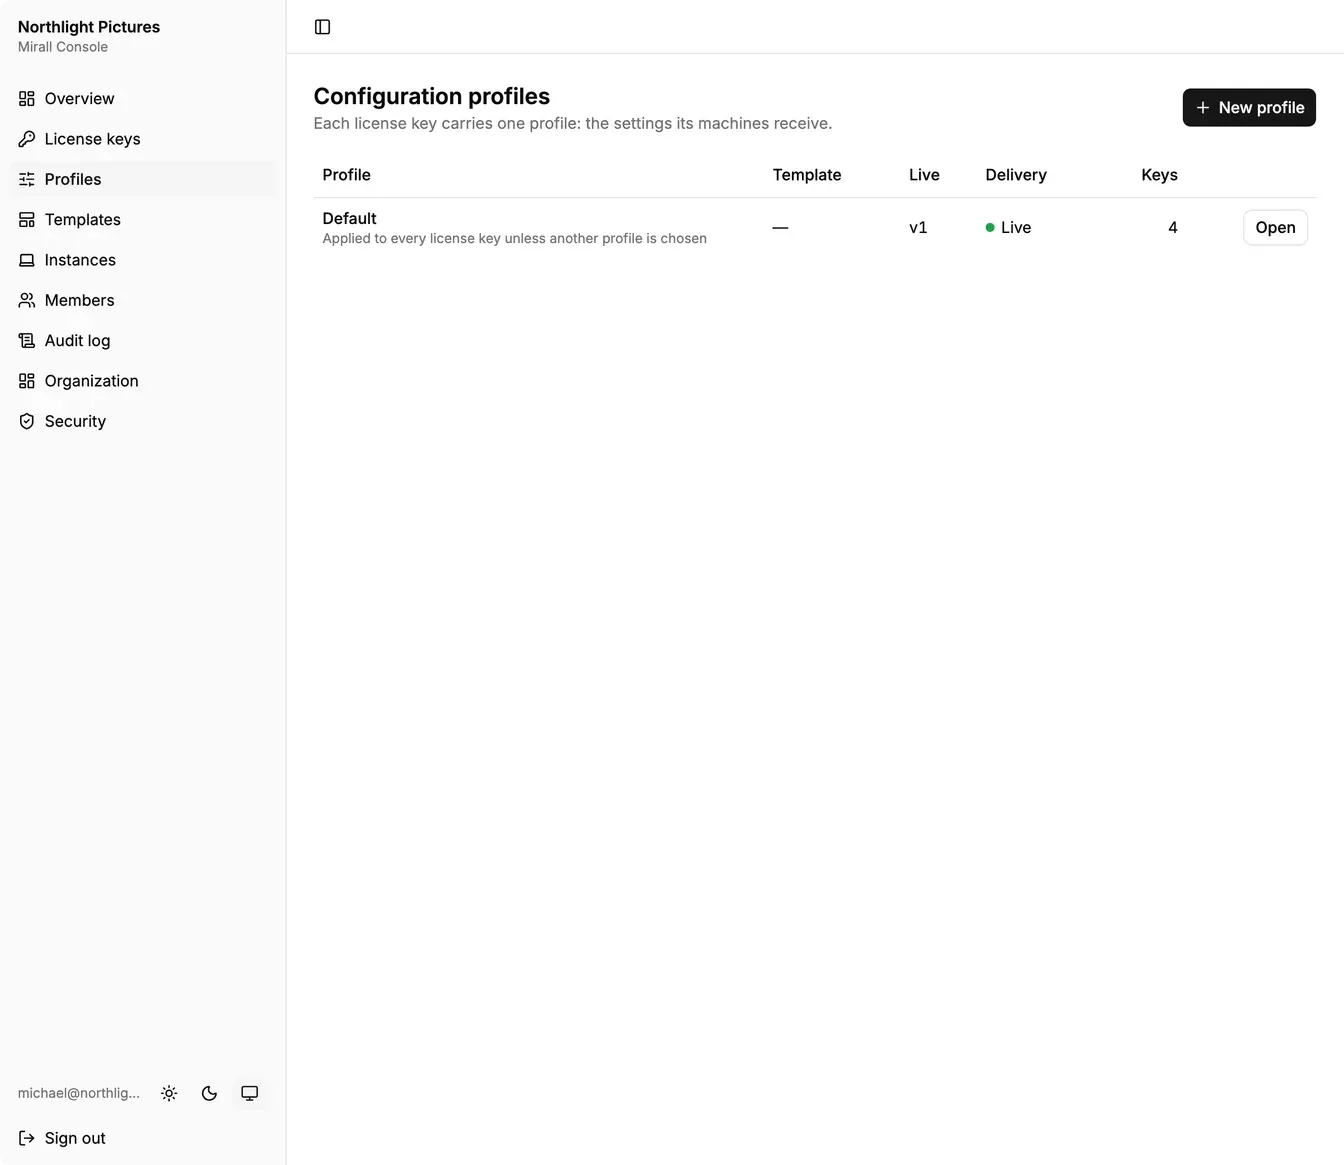
A profile is the set of settings its computers receive. Changing one is two steps: save the profile, then publish it.
1Open Profiles and click Open on the profile.
2Find the setting. Tick Set here and choose its value. Untick Set here to leave the setting to each computer again.
3Click Save. The bar at the bottom reads All changes saved.
4Click Publish in the delivery line at the top.
Publishing creates the profile's next version and sends it to every computer whose key uses the profile, within minutes. The delivery line reads Publishing, then Live with the version and when it reached your fleet.
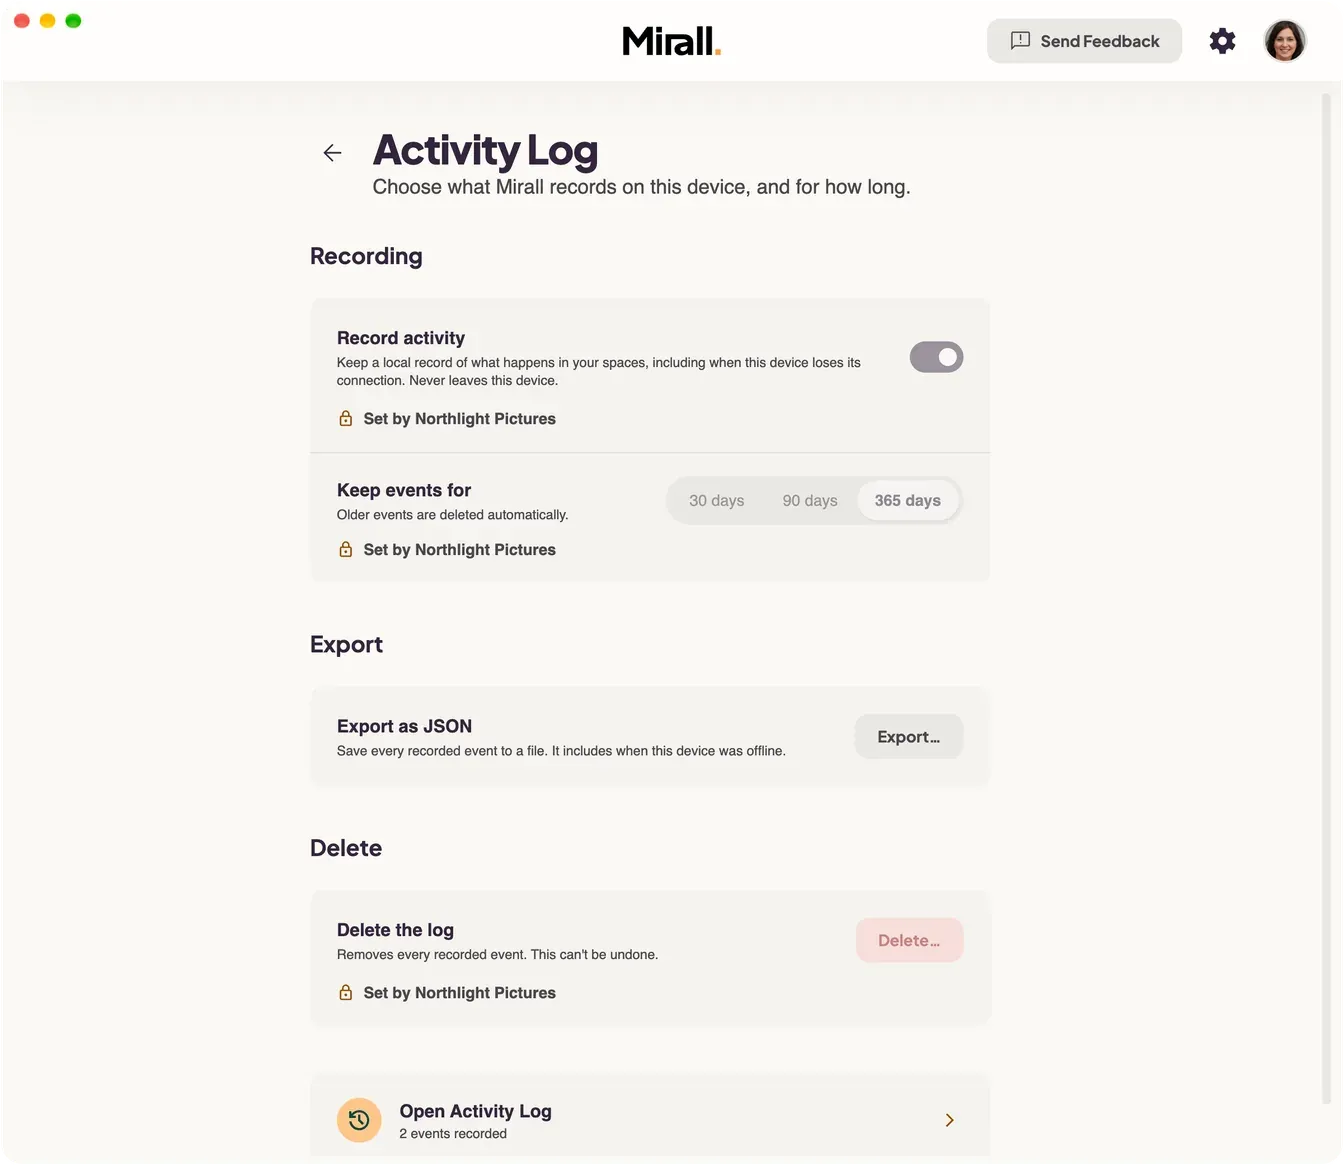
A setting you set is locked on every install: the person sees Set by <your organization> and can't change it. Settings marked Security · can only be tightened can only be required, never relaxed.
Publish waits while the form has unsaved changes. If delivery fails, the line reads Failed and offers Retry.
A template holds settings several profiles share. A profile based on it inherits them and can't unlock what it locks.
1Open Templates and click New template.
2Name it, for example Company baseline, and click Create template.
3Set its settings and click Save.
4Open each profile that should build on it, choose it under Based on template, then save and publish the profile.
In a profile, a setting the template sets reads From template and Locked by template. Profiles pick up a changed template the next time they are published.
Deleting a template (Delete template on its page) leaves its profiles in place; they stop inheriting from it.
Templates appears when your organization's plan has team features.
Go back to an earlier version
Each publish is kept as a version. Restoring one sends its settings again, as a new version.
1Open the profile and choose the Versions tab.
2Click Restore on the version. Its settings load into the Configuration tab.
3Check them, click Save, then Publish.
Add note records why a version exists; the note stays in the Console and never reaches a computer. Hide takes an old version out of the list, and Show hidden brings it back. The live version can't be hidden.
Require backups and choose where they go
Each computer keeps its encrypted backup in its own folder on a share you provide. People still choose their own passphrase, and nobody else ever holds it.
1Open the profile. Under Backup, tick Set here beside Backup folder for each platform your studio uses.
2Enter the folder as the share is reached on that platform, with {install} in it, for example \\server\share\{user}\{host}-{install} on Windows or /Volumes/share/{user}/{host}-{install} on macOS.
3To make a backup mandatory, tick Set here beside Require a backup.
4Save and publish the profile.
Below the field, the Console shows what the path becomes on an example computer, or why it would be refused. The share itself must exist; Mirall creates each computer's folders below it.
Backups stay encrypted with each person's own passphrase. Your organization stores them; it cannot open them.
Your studio's relay carries the connections a firewall would otherwise stop. We set it up with you as part of the rollout; this is how the Console hands it to every computer.
1Open the profile. Under Network, tick Set here beside Relay key and paste your relay's public key.
2Tick Set here beside Relay and choose when to use it: Automatic — when a direct connection fails, or Always — hide addresses from peers.
3Save and publish the profile.
The relay key is not a secret: anyone who has it can use the relay, and it can't read what it carries. Each computer shows both settings as set by your organization.
For the person at the computer. Your organization can manage some of Mirall's settings on the computers it looks after, and your administrator sends you an activation link to connect this one.
1Open the activation link on the computer where Mirall is installed. It opens in your browser, which hands it to Mirall.
2Mirall checks with your organization, then asks Connect Mirall to <organization>? and says what connecting means.
3Click Connect. Connected to <organization> confirms it.
An organization can set your relay, whether the Activity Log records and how long it keeps events, and your backup: it can require automatic backups and choose the folder they go to, in which Mirall makes this computer's own folder. A setting it manages reads Set by <organization> and can't be changed while you're connected. While it keeps recording on, Delete the log is unavailable; Export as JSON still works.
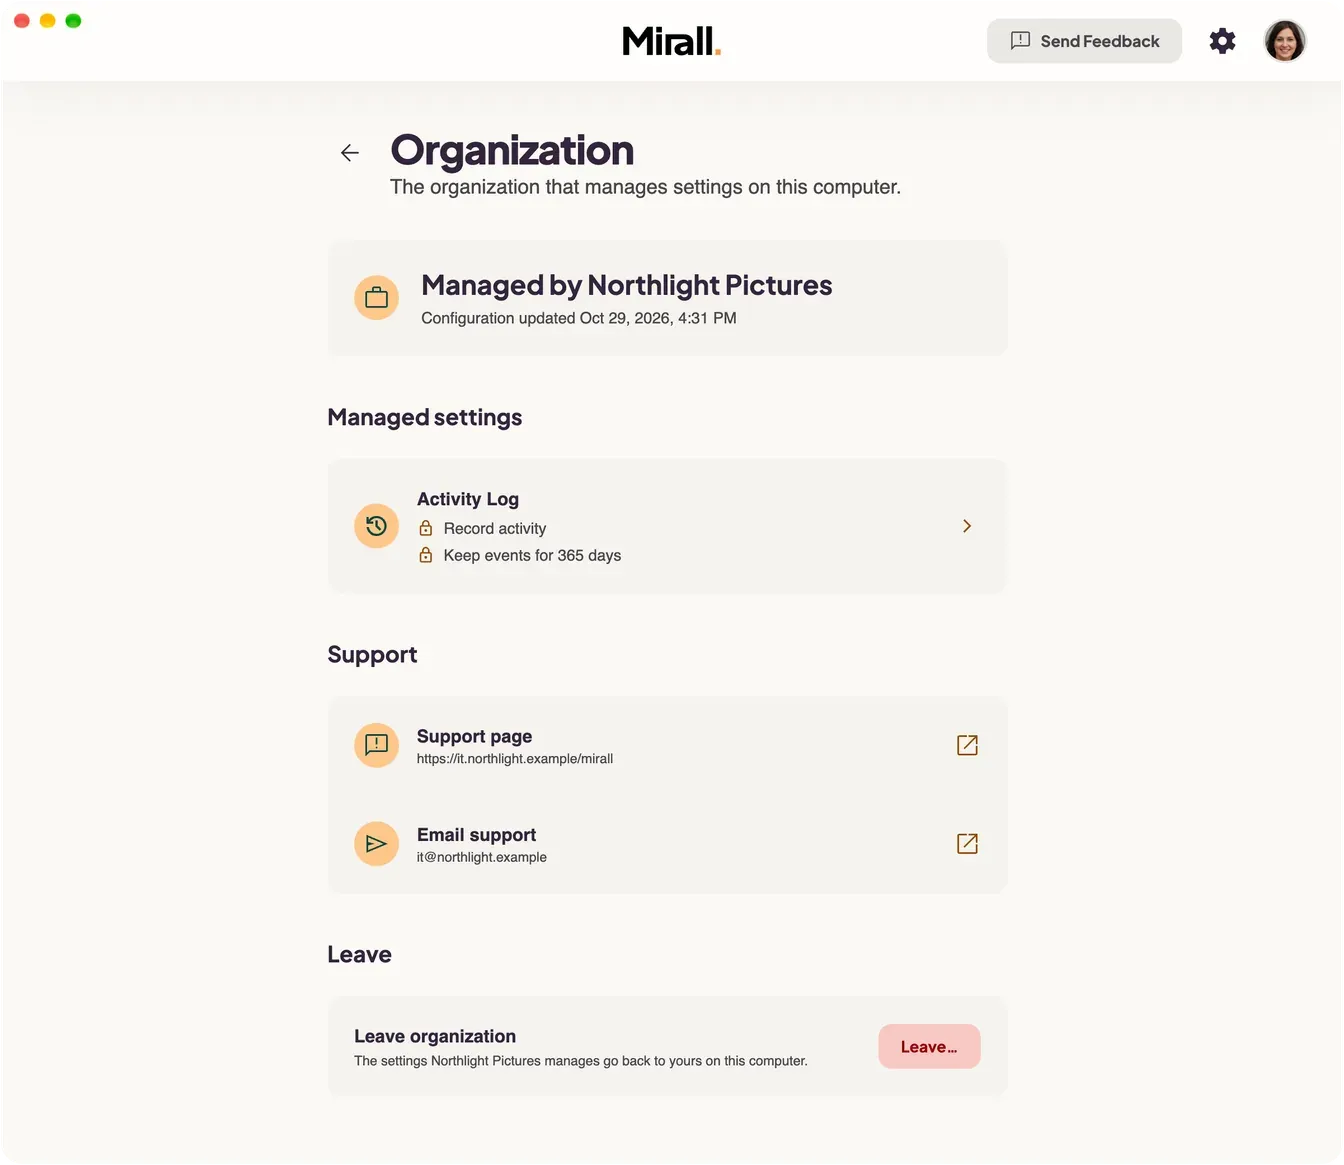
To see what it manages, open Profile → About Mirall → Organization, or Open organization in the command palette. The page lists the managed settings by settings page, with your organization's support links.
To leave, click Leave… on that page, then Leave. The settings it managed go back to yours. Backups already on its share stay there, encrypted with your passphrase.
While connected, Mirall tells your organization this computer's name, its Mirall version and operating system, which of the organization's settings are in effect, and whether its backup is working — and that it left, when you leave. Never your files, your spaces, or who you share with. The privacy policy has the details.
Instances lists every computer that reports with one of your keys, grouped by person, and your organization's own nodes below them.
1Open Instances.
2Read the computer's row: its Mirall version, whether its Configuration is up to date, and its Status.
3Click Details for its last report: when it connected and was last seen, when it applied its configuration, any settings it did not apply, and its backup.
A computer is Dormant after 14 days without a report, and active again with its next one. Computers that left or whose key was revoked are Retired; Show retired lists them.
From a key's details, Show in Instances lists only that key's computers. New on this key marks a computer that joined a key in the last 14 days while another computer still used it.
Everything here is reported by the app. Nothing on this page is enforced, and no report blocks anyone.